Replacing an Axe Handle
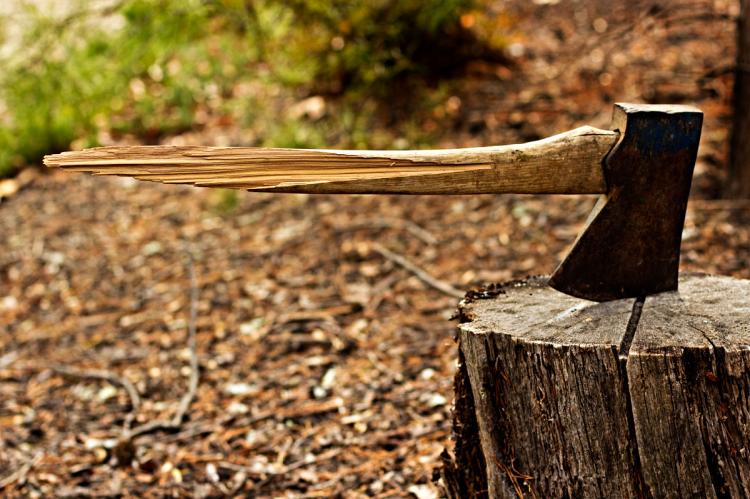
If you use an axe with any regularity, you will, at some point, be tasked with replacing its handle. If you break a handle on a cheap axe, you’ll be tempted to just buy a new axe.
And, while that certainly is an option, it really won’t save you any work, since you’ll still need to rework a new axe head to make it useable and safe.
I haven’t done a cost analysis, but I believe that after you factor in the cost of files, grinding belts, whetstones, your time, etc., it’s cheaper to replace a handle.
If nothing else, it’s a lot less wasteful and it’s easier to keep a couple of extra axe handles on-hand than it is to run to the store for a new axe, mid-wood cutting.
Plus, chicks dig when you whip out a new axe handle and rehang your axe.
Before rehanging your axe, you’ll obviously need to remove the old handle to make room for the new one, unless you’re starting with just an axe head.
How to Remove an Axe Handle
Basic tools for the project:
-
Vise
-
Hand saw
-
Drill
-
Slotted screwdriver or cold chisel
-
Pliers and a screw (for metal wedge removal)
-
Hammer
-
Some sort of implement for punching the handle out of the head (wooden block or cutoff axe handle)
DO NOT PUT YOUR AXE IN A FIRE! You’ll undoubtedly run across someone, at some time or another, who will offer the bad advice of burning out the old handle. Don’t do it! Yes, it will successfully remove the old handle, but it will ruin your axe head.
There are much better ways to get a handle off of an axe, and it really isn’t that difficult. Actually, the whole process of replacing an axe handle is pretty simple.
-
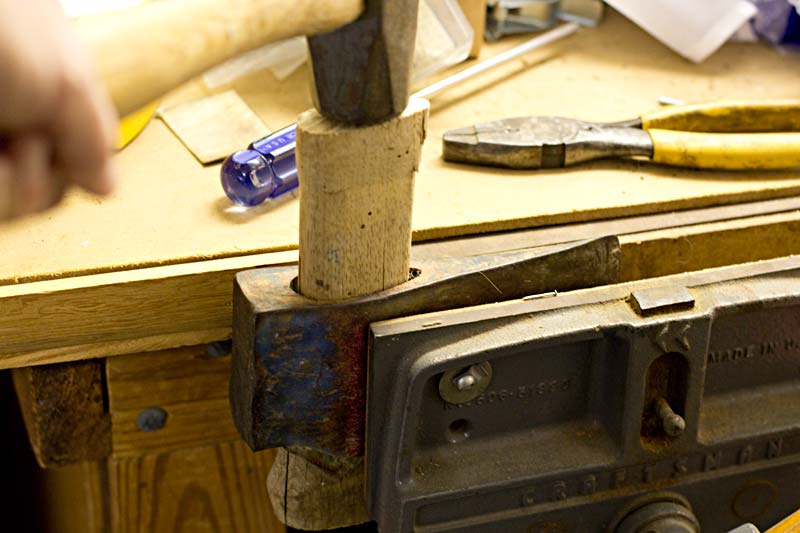
Secure your axe head firmly in a vise, handle angled up and out to facilitate sawing the handle off. If your vise jaw doesn’t have wooden cheeks, put a rag between the vise and the axe to avoid scratching the axe.
-
Using a hand saw, cut off off the old handle as close to the head as possible.
-
Now reposition the axe in the vise so that the top of the handle is facing up.
-
If the handle is fairly loose, you may be able to drive it through without removing the wedge. Skip to #7.
-
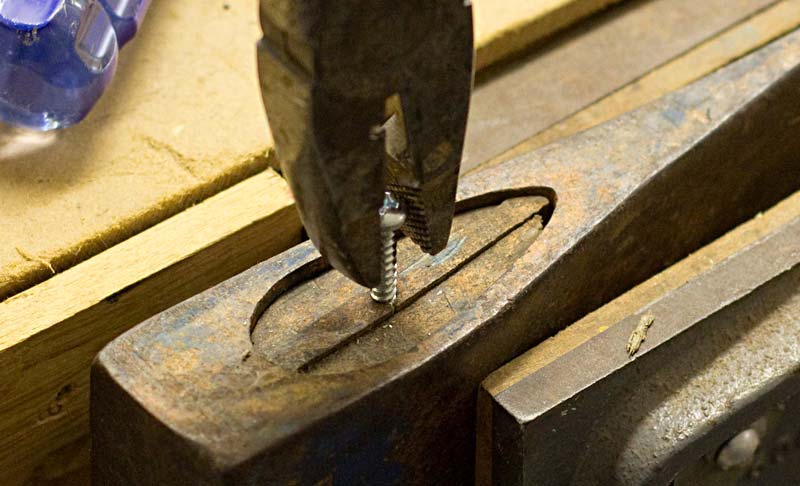
If there’s a large metal wedge in the handle, drill a small hole in the wedge, screw in a screw until it’s fairly secure, and pull out the wedge by gripping the screw with pliers. This may work for a wooden wedge, as well. If not, drill a few holes into the wedge, insert a screwdriver and pry the wedge out.
-
If there’s a smaller metal wedge driven across the wooden wedge, you’ll need to pry it out with a screwdriver or cold chisel. There’s no trick that I know of for this other than brute force.
-
Once you’ve gotten the old wedge out, you shouldn’t have any problems forcing what’s left of the handle through the eye. Simply place a block of wood--one that’s just smaller than the eye--where the old handle protrudes (or is recessed) from the eye, and tap it through. An old handle cutoff makes a perfect tool for this.
How to Choose an Axe Handle Replacement
Finding a decent handle may be the hardest part of the job. Depending on where you’re looking, it usually takes a bit of picking through what’s available.
Axe Handle Length & Shape
In most cases, you’ll just pick a handle that’s marked by the manufacturer for your particular style of axe.
Generally, longer handles are better suited for bigger cutting tasks. Longer handle = more leverage so more force of axe into wood.
A bigger felling axe in the three to six pound range would normally take a 32 to 36 inch handle, which would be appropriate for cutting bigger trees. Same goes for a splitting maul.
But you might want a shorter, say 24 inch handle, on a three pound head if you plan to do lighter work with it, like carving or limbing.
And of course smaller axes and hatchets need shorter handles.
Whether you choose a curved or straight handle is more personal preference. Double bit handles are usually straight, as are splitting maul handles.
A felling axe handle could go either way. I like a nicely balanced curved handle for a carving axe. Use what feels comfortable to you. Of course it may take some trial and error to figure that out.
Most axe manufacturers sell replacement handles specifically for their individual models if you want to go with an original factory handle.
Grain Orientation
Conventional wisdom dictates that you should look for grain that runs from the front of the handle to the back, or parallel to the bit of the axe.
Don't make the mistake of judging a handle by looking at the endgrain only.
Nic Westermann demonstrates that it's not so important whether the grain is parallel or perpendicular to the bit, as long as the grain runs straight through the length of the handle.
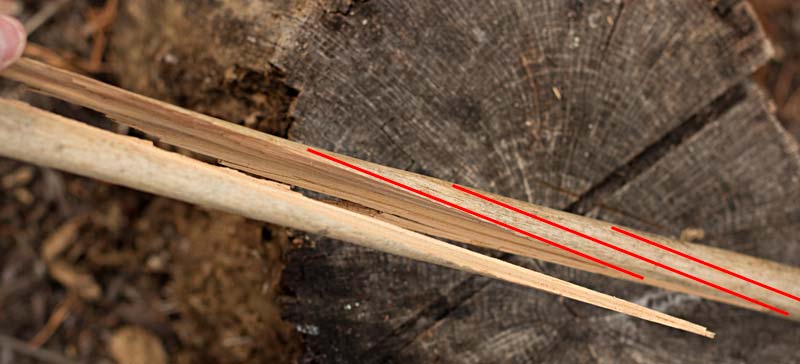
If you can find a straight-grained handle with rings that are parallel to the bit, then great, but, at the very least, it should be straight-grained.

Straight-grained handles are cut from straight-growing trees and they make stronger axe handles. Handles with diagonal or sloping grain are cut from twisted trees--they make weaker handles.
Since it’s harder to come by straight, choice trees these days, it’s harder to find good, strong axe handles, so expect to do a bit of scrutinizing when selecting a handle.
Avoid knots and pinholes which will weaken the handle. You should also avoid handles that have been stained or fire-hardened to hide grain orientation.
Heartwood Vs. Sapwood
Conventional wisdom also tells us to look for handles that are made primarily of hickory sapwood which is lighter in color than the dark reddish-brown heartwood.
The difference in strength between the two is probably insignificant, though, which is what this Forest Service research tells us: https://www.fpl.fs.fed.us/documnts/fplrn/fplrn147.pdf
Some will argue, but I personally haven’t noticed any issues with using heartwood. Good grain orientation is much more important.
Varnish
You will also want to consider the lacquer that is applied by the factory on most commercially made axe handles. There are a number of reasons you may not want this:
-
Blisters--the slick finish actually increases friction when you’re swinging which can result in nasty blisters.
-
Potentially toxic--this may be a negligible concern, but I’m no fan of synthetics, especially when it contacts my skin directly.
-
Aesthetic--of course this is purely subjective. The traditionalists among us prefer the more earthy, natural look and feel of an oiled finish.
You can find handles that aren’t varnished, but they’re generally slightly more expensive. Why, you ask, would it be more expensive when the spray-finish is an added step?
Lacquer protects the handles as they jump through the chain of custody from manufacture to retail. They’re shipped, dropped, abused, banged-up, and handled several times over before they finally reach the end-user.
Without lacquer, greasy handprints, scuffs, scrapes, and dirt would render the handles unappealing to potential buyers; in the long run, the spray-finish saves the manufacturer money by preventing the product from being rejected.
You can remove the factory varnish fairly easily by scraping it off with a cabinet scraper or a shard of broken glass. It only takes a few minutes to do this.
If you choose to remove the lacquer or you buy an un-varnished handle, you’ll want to apply an oil finish after you hang the handle on your axe head.
How to Replace an Axe Handle
-
Axe handle
-
Hand saw
-
Pencil
-
Sharp knife (a pocket knife is perfect)
-
Rasp
-
Coping saw
-
Wooden wedge
-
Boiled linseed oil
Before hanging your axe on the new handle, you may want to take some time to clean up the head. Otherwise, proceed with the axe handle replacement.
-
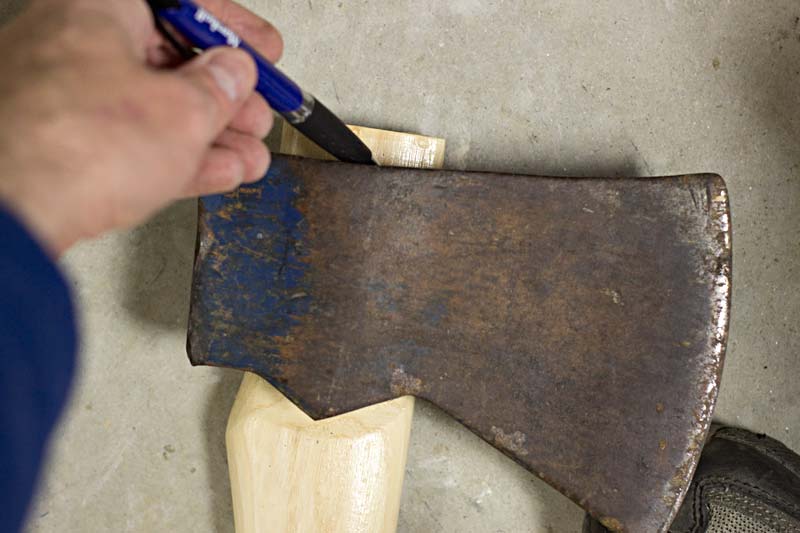
Hold the handle up to the head of the axe, aligning the shoulder of the handle with the bottom of the axe’s eye. Using a pencil, mark the handle at the top of the eye.
-
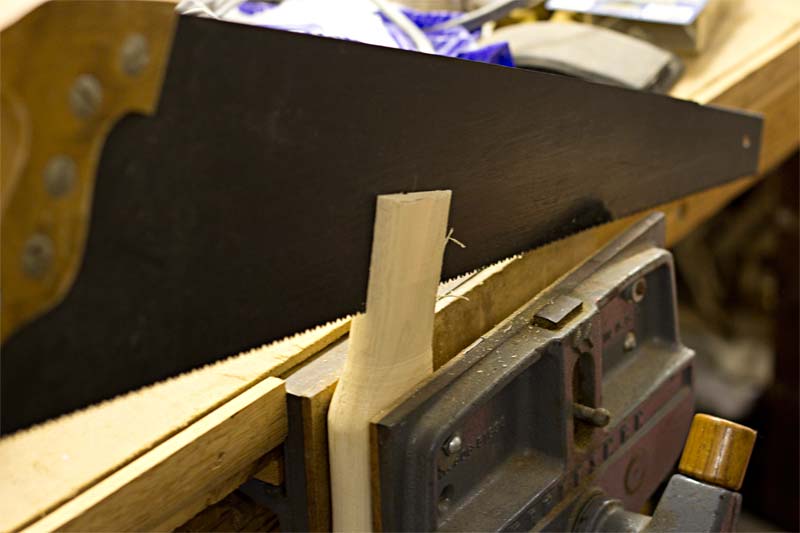
Cut off the handle at the pencil mark -- getting rid of the extra length will make hanging the axe easier.
-
Use a hand saw to make the wedge kerf deeper, since cutting off the top of the handle will leave a kerf that’s too shallow. It should be ⅔ the depth of the axe’s eye.
-
If your handle has a fawn’s foot, cut off an inch or so of the tip to leave a flat surface for pounding with a mallet or hammer.
-
Insert the new handle into the bottom of the axe’s eye as far as it will go, being careful to keep the handle centered in the eye and perpendicular to the top of the axe. Make sure it's secure enough to turn the axe upside down without the head falling off.
-
Holding the axe upside down, tap the end of the handle with a mallet or hammer to drive the handle into the head. This is somewhat counter-intuitive -- it may seem like you're forcing the axe head off of the handle since the head is upside down just above the ground. Don't tap so hard as to crack the handle.
-
If you can't get the head fully seated on the handle with a reasonable amount of force, remove the axe head. Look for the rusty/dirty areas on the axe handle -- this is where the handle makes contact with the inside of the eye. These areas will need to be shaved or rasped down. You'll probably need to do this 7 or 8 times before the axe is properly seated.

Just take a little at a time. You want to retain enough resistance to give the handle a tight fit. If the handle slips right in, it will slip right off when you try to use it.
When you’re finished, the bottom of the eye should be on the shoulder of the handle. -
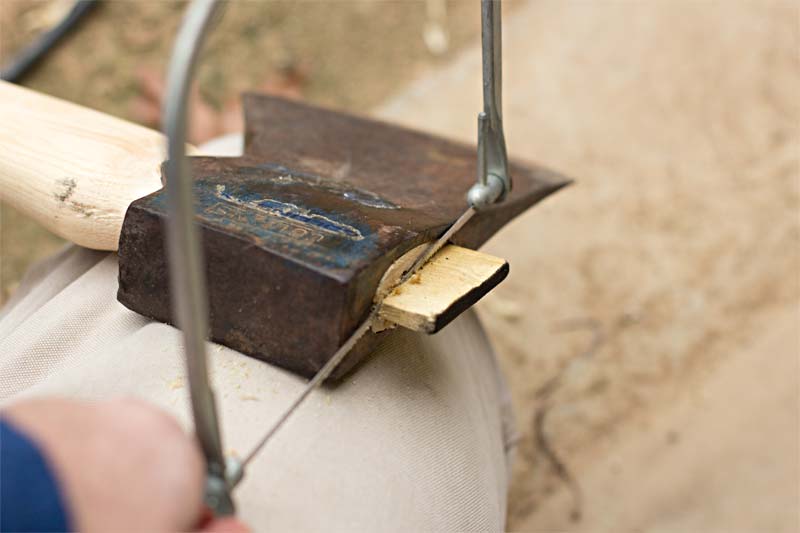
Either cut off the top of the handle flush with the axe head or leave it protruding no more than a quarter inch or so. A coping saw works well for this.
-
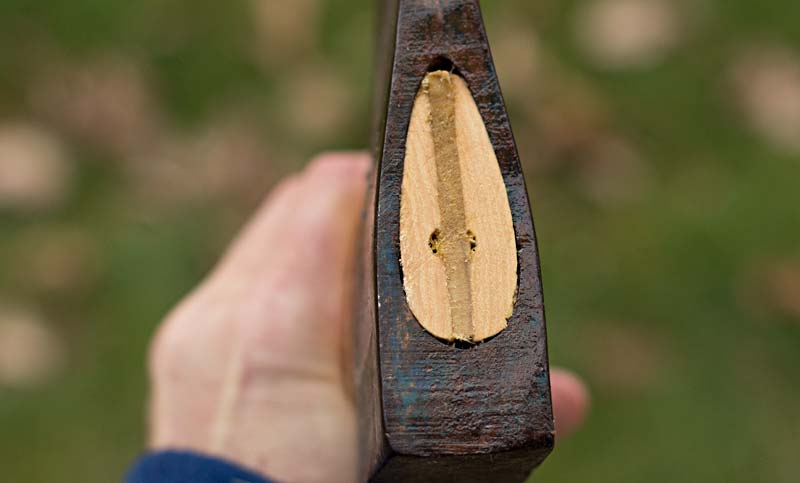
If your handle didn’t come with a wedge, you’ll need to make one out of a hardwood like poplar. Use a pocketknife to shave down the wedge if necessary for a good fit in the kerf. Then coat it with boiled linseed oil and drive it into the kerf to secure the axe head to the handle.
Be careful not to drive it so far that the wedge splits. -
The wedge will likely protrude from the handle a bit, so you’ll want to saw it flush with a coping saw.
You may also want to drive a metal wedge across the wooden wedge.
-
Give the handle--both top and along the length--a good coat of boiled linseed oil, wiping off any residue.
Now you’re ready to swing your axe into some wood. And should your handle fail again, you’ll be better prepared to rehang your axe next time.